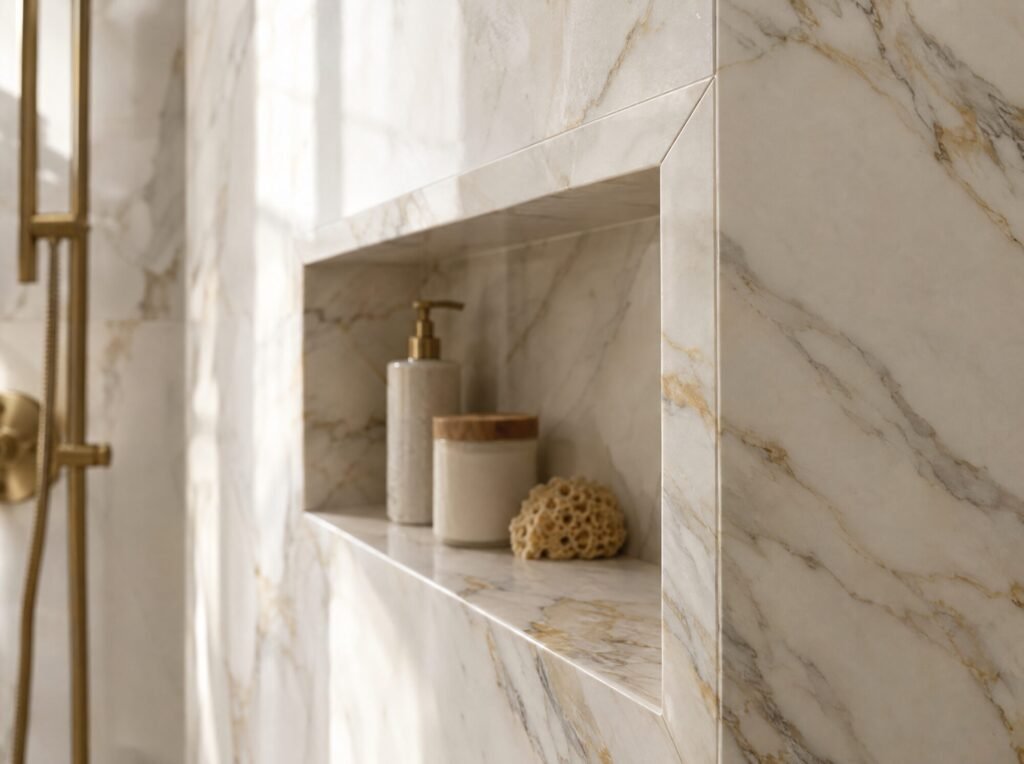
Look closely at a high-end tiled shower, niche or feature wall and you’ll often notice what isn’t there: no shiny metal strip on the corners. Instead, the tile seems to wrap around the edge as one solid piece. That’s a 45° mitered corner finished with epoxy, and it has become one of the clearest signs of a top-tier tile installer.
Here’s what this detail is, why pros prefer it, how it’s done, and when it’s the right choice for your project.
What is a 45° epoxy corner?
Where two tiled surfaces meet at an outside corner, such as the edge of a niche, a shower curb, a window return or a half wall, the tile edges have to be finished somehow. There are three common ways to do it:
- Metal or PVC trim. A pre-made profile set into the mortar covers the raw tile edge. It’s fast and affordable, but the strip is visible, can dent or scratch, and usually can’t be repaired without tearing it out.
- Bullnose tile. A tile with a factory-rounded edge. It’s a classic look, but many modern porcelains, especially large-format tile, don’t come with matching bullnose pieces.
- Mitered corner. Each tile edge is cut at 45° so the two pieces meet in a crisp point, like a picture frame. On a pro install, the joint is then filled with a color-matched epoxy and shaped into a tight, smooth edge.
The epoxy is what takes a miter from good to great. Instead of a hairline grout joint on a sharp, chip-prone point, you get a solid, slightly eased edge that looks continuous with the tile.
Why pros prefer epoxy-finished miters
- A seamless, high-end look. The pattern of marble-look porcelain appears to continue around the corner, which is exactly how a solid stone slab would look.
- No metal to dent or corrode. There’s no strip to scratch, tarnish or clash with your fixtures.
- Tougher edges. A sharp, bare miter can chip. A properly filled and slightly eased epoxy edge holds up much better to everyday knocks.
- Repairable. A small chip in an epoxy corner can usually be filled and re-shaped. A damaged metal trim usually has to come out.
- Works with modern tile. Large-format and slab porcelain rarely have matching trim pieces. Mitering is often the only way to finish them cleanly.
Where 45° corners make the biggest difference
- Shower niches and recessed shelves
- Shower curbs and benches
- Window returns and wall openings
- Outside corners on feature walls and fireplace surrounds
- Kitchen islands, backsplash ends and waterfall edges in large porcelain panels
How pros do it
1. Plan the layout first
A miter only looks seamless if the tile on both sides lines up. Pros plan the layout so the pattern and grout joints meet exactly at the corner, which often means starting the layout from the corner rather than from a wall.
2. Cut a clean 45° edge
The edge is cut with a wet saw that tilts to 45°, or with a diamond chamfering attachment on an angle grinder. Most installers leave a very thin flat strip of tile body under the glaze instead of grinding to a razor point, because a knife-thin edge chips easily.
3. Grind and polish the edge
The cut is refined with diamond pads so it’s straight and smooth. On porcelain where the body color is different from the surface glaze, this step matters, because the edge is what the epoxy has to blend with.
4. Set the tile with a consistent gap
The two mitered pieces are set so they meet cleanly, with full mortar coverage behind them. Some pros bond the corner at the same time with a fast-setting adhesive. Others leave a small, even gap to fill afterward.
5. Fill with color-matched epoxy
The tile faces next to the corner are masked off, and an epoxy tinted to match the tile is pressed into the joint. Matte tile gets a matte epoxy and polished tile a glossy one. The tape comes off while the epoxy is still workable so the edge stays clean.
6. Cure and finish
After the epoxy has cured according to the manufacturer’s instructions, the corner is lightly sanded or polished so it’s smooth to the touch and blends into the tile.
The tool that makes clean miters easier
For miters on tile that’s already cut to size, or on pieces too awkward for a wet saw, many installers use a diamond tile chamfering attachment on an angle grinder. It holds the blade at a fixed 45° and guides it along the tile edge, so the bevel is straight and consistent along the whole length. It’s especially handy for niche edges and short returns.
This is the one we’d point you to if you want to see the type of tool we mean: Tile Chamfering Tool with Diamond Blades (Amazon).
The blade matters as much as the tool. For this chamfering tool, these are the replacement blades we highly recommend, because they cut cleanly and leave a crisp edge with less chipping on porcelain: Recommended Diamond Blades for the Chamfering Tool (Amazon).
A good tool helps, but mitering is still a skill. Getting a perfect corner on expensive porcelain takes practice, and a bad cut costs you a whole tile.
When a miter isn’t the best choice
- Very high-impact corners in busy areas, where a metal trim may be the more practical option.
- Some glazed ceramic tile whose body is a very different color from the surface. It can be done, but the epoxy has to hide more.
- Tight budgets. Mitering takes noticeably more labor than setting a trim strip, and that shows up in the quote.
Questions to ask your tile installer
- Will you miter the outside corners, or use trim? Can I see photos of mitered corners you’ve done?
- How do you finish the miter: grout, caulk or color-matched epoxy?
- How will the layout line up at the corners and niches?
- If a corner chips in the future, how would you repair it?
Frequently asked questions
Are mitered tile corners durable?
Yes, when they’re done properly. A miter with a thin flat edge, full mortar support and an epoxy fill is a strong corner. Bare razor-sharp miters are the ones that chip.
Can any tile be mitered?
Most porcelain and natural stone can. Results are best with through-body or color-body porcelain, where the color goes all the way through the tile.
Does mitering cost more than metal trim?
Usually, yes. It takes extra cutting, polishing and finishing time. For many homeowners, the seamless look is worth it on the most visible corners, while trim is used where nobody will notice.
Header image: illustration of a mitered tile niche (AI-generated).
Want seamless mitered corners in your San Francisco or Marin bathroom? It’s one of the details we take the most pride in. Request an estimate and ask us about mitered niches and corners.